실습1. Python과 GPIO
- 라즈베리파이에서 주로 사용하는 프로그래밍 언어: Python, C
- Python: 1991년 귀도 반 로섬이 발표. 특징은 아래와 같음(7)
- 플랫폼 독립적
- 인터프리터 방식
- 객체 지향적
- 동적 타이핑 대화형 언어
- 다양한 플랫폼에서 사용가능
- 라이브러리가 풍부
- 여러 연구, 교육 기관 및 산업계에서 이용
- 라즈베리파이에서 파이썬 사용하기: Thonny 실행.
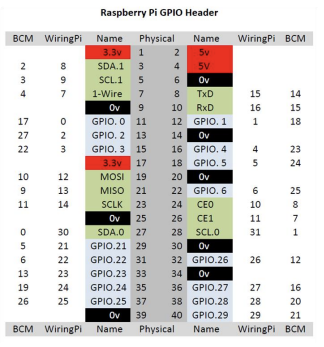
- GPIO를 사용할 때는 피지컬 핀번호와 라이브러리가 인식하는 핀번호를 잘 구분해서 사용해야함.
- wiringPi: 라즈베리파이에서 GPIO 핀을 제어하는 데 사용되는 라이브러리.(2019 이후 더 유지보수 안됨.)
C언어 사용, github로 다운로드 가능, python에서 사용된 BCM과 핀의 위치가 다르므로 주의.
- wiringPi 설치: Wiring Pi 클릭 -> Code-> Download Zip 선택 -> 압축 해제 후 /home/pi로 이동
$ cd /home/pi/WiringPi-master
$ ./build (//라이브러리 빌드)
$ sudo gpio -v gpio readall (// 설치 확인.)
$ gpio readal (//BCM 규격과 wPi 규격에서 스위치 확인)
- C 언어는 gedit나 nano 에디터로 작성.
- gedit
- 설치: $ sudo apt install gedit
- 쉘과 gedit 동시 실행: $ gedit &
- 빌드: $ gcc -o led led.c -lwiringPi (// led.c 파일을 컴파일해 led라는 실행 가능한 바이너리 파일 생성)
- 실행 파일 실행: $ ./led (// led 실행파일 실행)
- gpio 포트 접근 비교
- Python: import RPi.GPIO as gpio/ gpio.setmode(gpio.BCM)/ gpio.setup(4, gpio.IN)/ gpio.input(4)== 0
- C: #include <whiringPi>/ wiringPiSetup(): 라이브러리 초기화/ pinMode(LED, OUTPUT);
(1) LED
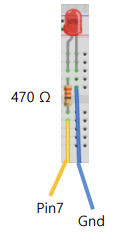
- LED in Python
import RPi.GPIO as gpio #Use the GPIO module of RPi
import time #Use time module
PIN = 7 # BCM: pin 4
gpio.setmode(gpio.BOARD)	# 보드 핀번호 쓸 것임.
gpio.setup(PIN, gpio.OUT)	# 해당 핀을 OUPUT으로 사용할 것임.
print(”Press (CTRL-c) to exit)”)
try:
	while True:
		gpio.output(PIN, True)
		time.sleep(0.1)
		gpio.output(PIN,False)
		time.sleep(0.1)
except KeyboardInterrupt:
	gpio.cleanup()
- LED in C
#include <stdio.h>
#include <wiringPi.h> // include wiringPi라이브러리
#define LED 7 // BCM: pin 4
int main(void) {
	if (wiringPiSetup() == -1 ) { //init pin set
		printf(“Error occurred!\n”);
		return -1;
	}
	pinMode(LED, OUTPUT); // set LED to OUT
	while (1) {
		digitalWrite(LED, 1); //set LED HIGH
		delay(1000);
		digitalWrite(LED, 0); //set LED LOW
		delay(1000);
	}
return 0;
}
(2) Switch
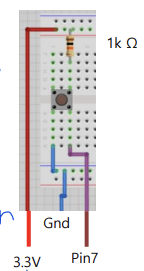
- Switch in Python
import RPi.GPIO as gpio #Use the GPIO module of RPi
import time #Use time module

gpio.setmode(gpio.BCM)
gpio.setup(4 , gpio.IN)
print(“Press the button”)

try:
	while True :
		if gpio.input(4)==0:
		print("Button pressed!")
		time.sleep(1)
		print("Press the button (CTRL-C to exit)")
except KeyboardInterrupt:
	gpio.cleanup()
- Switch in C
#include <stdio.h>
#include <wiringPi.h> // include wiringPi library
#define SW 7 // BCM: pin 4
int main(void) {
	if (wiringPiSetup() == -1 ) { //init pin set
		printf("Error occurred!\n");
		return -1;
	}
	pinMode(SW, INPUT); // set SW to IN
	//Continued on the back
	while (1) {
	if (digitalRead(SW) == 0) {
		printf("Button pressed\n");
		delay(1000);
		printf("Press (CTRL-c) to exit\n");
		}
	}
	return 0;
}
실습2. 초음파 센서
- 초음파 센서
: 초음파를 전방으로 출력, 반사되어 돌아오기까지의 시간 측정
- Trigger: 초음파 센서의 송신부로 신호 전달.
- Echo: 초음파 센서의 수신부에서 신호를 받음.
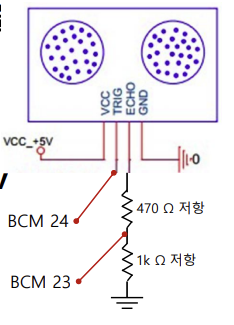
- 저항 셋팅: 라즈베리 파이는 3.3 V 입력 요구. 초음파 센서 Echo핀은 5V 신호 제공.-> 저항필요!
-> 1kΩ 과 470Ω 저항으로 5v 를 3.3v 로 변환 .(5V x (470Ω / (1kΩ + 470Ω)) = 3.3V)
- Ultrasonic in C
#include <stdio.h>
#include <wiringPi.h>

#define TRIG 5
#define ECHO 4

int main(void)
{
	long distance = 0, startTime, travelTime;
	if (wiringPiSetup() == -1) {
	return 1;
}

pinMode(TRIG, OUTPUT);
pinMode(ECHO, INPUT);

while (1) {
	digitalWrite(TRIG, LOW);
	usleep(2);
	digitalWrite(TRIG, HIGH);
	usleep(20);
	digitalWrite(TRIG, LOW);

	while (digitalRead(ECHO) == LOW);
	startTime = micros();
	while (digitalRead(ECHO) == HIGH);
	travelTime = micros() - startTime;

	distance = travelTime / 58;
	printf("Distance: %ld\n", distance);
	delay(100);
	}
}
- Ultrasonic in Python
import RPi.GPIO as gpio #Use the GPIO module of RPi
import time #Use time module
gpio.setmode(gpio.BCM) #Works with gpio in BCM(Broadcom chip-specific pin numbers mode)
trig = 24
echo = 23
print("start ultrasonic sensor")
gpio.setup(trig, gpio.OUT) #Set trigger pin to OUT
gpio.setup(echo, gpio.IN) #Set echo pin to IN
try: #for Exception
	while True:
		gpio.output(trig, False)
		time.sleep(0.5)
		gpio.output(trig, True)
		time.sleep(0.00001)
		gpio.output(trig, False)

		while gpio.input(echo) == 0:
			pulse_start = time.time() #return the time since January 1, 1970
		while gpio.input(echo) == 1:
			pulse_end = time.time() #return the time since January 1, 1970

        pulse_duration = pulse_end - pulse_start
        distance = pulse_duration * 17000 #time * speed / 2
        distance = round(distance, 2) #Cut in second decimal place
        print("Distance: ", distance, “cm”)
except:
	gpio.cleanup()
????이상하구만.. 분명 아두이노로 초음파 센서를 사용할 때는 echo의 초기상태가 high였는데 여기서는 low이넴.. 모지..
'Computer Science > Embedded System Design' 카테고리의 다른 글
| [임베디드] 3장 라즈베리파이 실습 (2) (0) | 2023.10.20 |
|---|---|
| [임베디드] 2장 라즈베리파이 소개 (0) | 2023.10.20 |
| [임베디드] 1장 아두이노보드 실습 (2) (0) | 2023.10.20 |
| [임베디드] 1장 아두이노보드 실습 (1) (0) | 2023.10.20 |
| [임베디드] 0장 임베디드 시스템과 아두이노 보드 (2) | 2023.09.20 |


