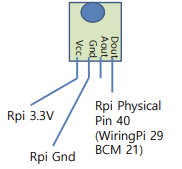
실습3. 사운드 센서
- 사운드 센서: 소리가 감지될 경우 소리의 세기만큼 LED 밝게 켜짐.
- SoundSensor in C
#include <stdio.h>
#include <wiringPi.h>
#define SOUND 29 // BCM 21 // physical pin 40

int main(void) {
	if (wiringPiSetup() == -1) {
	return 1;
	}

    pinMode(SOUND, INPUT);

    while (1) {
        if (digitalRead(SOUND) == 1)
        printf(“Sound detected\n”);
        else
            printf(“No sound detected\n”);
        delay(500);
        }
    return 0;
}
- SoundSensor in Python
import RPi.GPIO as gpio #Use the GPIO module of RPi
import time #Use time module

gpio.setmode(gpio.BCM) #Works with gpio in BCM(Broadcom chip-specific pin numbers mode)
sound = 21 # Physical 40

print(“start sound sensor”)

gpio.setup(sound, gpio.IN) #Set sound digital output pin to IN
try: #for Exception
	while True:
    	if gpio.input(sound) == 1:
    		print(“Sound detected!”)
    	else:
    		print(“No sound detected!”)
    	time.sleep(0.5)
except:
	gpio.cleanup()
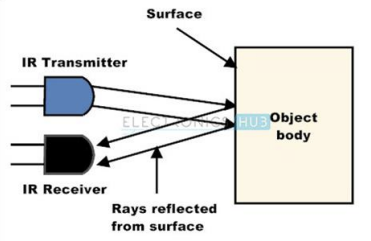
실습4. Infra Red
- IR 센서: 적외선 송신기에서 적외선 신호를 전송.
반사된 적외선 신호를 감지해 가까이 있는 물체 감지.
체온(36.5도)과 움직임이 감지되면 신호를 보냄.
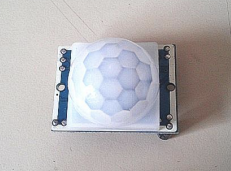
축구공 모양처럼 생김

- IR in C
#include <stdio.h>
#include <wiringPi.h>
#define PIR 4 //BCM 23

int main(void) {
	if (wiringPiSetup() == -1) {
	return 1;
	}
	pinMode(PIR, INPUT);
    while (1) {
        if (digitalRead(PIR) == 1)
            printf(“Detected\n”);
        else
            printf(“Not detected\n”);
        delay(1000);
    }
    return 0;
}
- IR in Python
import RPi.GPIO as gpio #Use the GPIO module of RPi
import time #Use time module

gpio.setmode(gpio.BCM) #Works with gpio in BCM(Broadcom chip-specific pin numbers mode)
pir = 23
print(“start ultrasonic sensor”)
gpio.setup(pir, gpio.IN) #Set pir pin to IN

try: #for Exception
    while True:
        if gpio.input(pir) == 1:
            print(“Object detected!”)
        else:
            print(“Not detected!”)
        time.sleep(1)
except:
	gpio.cleanup()
실습5. temperature&humidity sensor(dht11)
- dht11
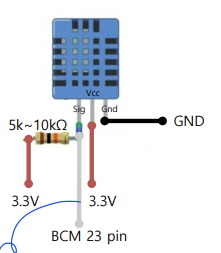
- digital output이 MCU(마이크로 컨트롤러 유닛)와 DHT11센서의 data communication, 동기화에 사용됨.
(아두이노 - MCU, 라즈베리파이 - MPU)

- 데이터 전송의 정확도를 위해 8비트 체크섬 연산
- DHT11이 MCU 신호를 감지하면, DHT 신호를 전송.
- 데이터 비트 0의 경우: 약 20~28 마이크로초 동안 HIGH(높은 상태)를 유지.
- 데이터 비트 1의 경우: 약 70 마이크로초 동안 HIGH를 유지.
- dht11 in C
#include <wiringPi.h>
#include <stdio.h>
#include <stdlib.h>
#include <stdint.h>
#define MAXTIMINGS 83
#define DHTPIN 4
int dht11_dat[5] = {0, } ;
void read_dht11_dat()
{
uint8_t laststate = HIGH ;
uint8_t counter = 0 ;
uint8_t j = 0, i ;
uint8_t flag = HIGH ;
uint8_t state = 0 ;
float f ;
dht11_dat[0] = dht11_dat[1] = dht11_dat[2] = dht11_dat[3] =
dht11_dat[4] = 0 ;
pinMode(DHTPIN, OUTPUT) ;
digitalWrite(DHTPIN, LOW) ;
delay(18) ;
digitalWrite(DHTPIN, HIGH) ;
delayMicroseconds(30) ;
pinMode(DHTPIN, INPUT) ;
for (i = 0; i < MAXTIMINGS; i++) {
counter = 0 ;
while ( digitalRead(DHTPIN) == laststate) {
counter++ ;
delayMicroseconds(1) ;
if (counter == 200) break ;
}
laststate = digitalRead(DHTPIN) ;
if (counter == 200) break ; // if while breaked by timer, break
for
if ((i >= 4) && (i % 2 == 0)) {
dht11_dat[j / 8] <<= 1 ;
if (counter > 20) dht11_dat[j / 8] |= 1 ;
j++ ;
}
}
if ((j >= 40) && (dht11_dat[4] == ((dht11_dat[0] + dht11_dat[1]
+ dht11_dat[2] + dht11_dat[3]) & 0xff))) {
printf("humidity = %d.%d %% Temperature = %d.%d *C \n",
dht11_dat[0], dht11_dat[1], dht11_dat[2], dht11_dat[3]) ;
}
else printf("Data get failed\n") ;
}
int main(void)
{
printf("dht11 Raspberry pi\n") ;
if (wiringPiSetup() == -1) exit(1) ;
while (1) {
read_dht11_dat() ;
delay(1000) ;
}
re
- 파이썬 환경에서 dht11을 사용할 거면 " Adafruit DHT Library" 를 사용하면 편함!
- $ sudo apt-get install git-core (//git core 패키지 설치)
- $ git clone https://github.com/adafruit/Adafruit_Python_DHT.git
- $ cd Adafruit_Python_DHT
- $ sudo apt-get install build-essential python-dev (컴파일, 빌드 도구와 파이썬 개발 환경 설치)
- $ sudo python3 setup.py install (// 라이브러리 설치)
- dht11 in Python
import sys
import Adafruit_DHT
import time
import datetime

while True:
	print("Time: " + str(datetime.datetime.now()))	// 현재 시간 출력
	humidity, temperature = Adafruit_DHT.read_retry(11, 23) #DHT11, input=BCM pin 23
	print('Temp: {0:0.1f} C Humidity: {1:0.1f} %'.format(temperature, humidity))
	time.sleep(1)
'Computer Science > Embedded System Design' 카테고리의 다른 글
| [임베디드] 3장 라즈베리파이 실습 (1) (0) | 2023.10.20 |
|---|---|
| [임베디드] 2장 라즈베리파이 소개 (0) | 2023.10.20 |
| [임베디드] 1장 아두이노보드 실습 (2) (0) | 2023.10.20 |
| [임베디드] 1장 아두이노보드 실습 (1) (0) | 2023.10.20 |
| [임베디드] 0장 임베디드 시스템과 아두이노 보드 (2) | 2023.09.20 |


